GCPのGoogle Cloud Functionsで複数画像を合成して1枚のOGPを作成する
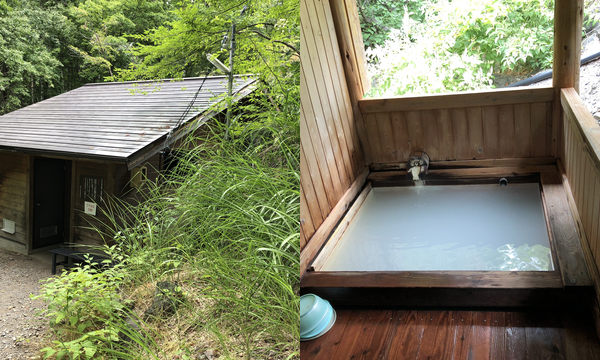 (画像は最近いった秘湯の温泉。クマ🐻が何度もでているらしい。警戒しながら入りました。)
ウェブサイトを運用していると、OGPを設定しますがそのOGP画像に、上記の画像のように、複数の画像を1枚に合成した画像を使いたくなるときがあります。最近業務で、Google Coud Functionsで実装したのでその方法を共有します。
やりたいこと
- Google Cloud Storageにある2枚の画像を合成し1枚の画像にしてGoogle Cloud Storageに保存する
- TriggerはGCPのCloud FunctionsのHTTPリクエストを使う
- Cloud FunctionsはTypeScriptで書く
- エミュレータを使用し、ローカルで試せるようにする
環境設定
macOSで開発していきます。
あらかじめGCPのプロジェクトを作成しておき、gcloudコマンドがローカルで動くようにしておきます。
cloud-functions-ogpをレポジトリとして、まずはnodeのバージョンを設定し、Google Cloud Functions Emulatorを動かせるようにします。今回はndenvでバージョンを指定しましたが、特にndenvを使う必要はありません。
cd cloud-functions-ogp
ndenv local v8.11.1
npm install -g @google-cloud/functions-emulator
gcloudでプロジェクト設定をしてから、シミュレータを動かします。この記事ではプロジェクト名はwapa5pow-goですが、適宜自分のものと置き換えてください。
$ gcloud config set project wapa5pow-go
$ functions config set projectId wapa5pow-go
$ functions start
正しく設定されているかfunctions statusで確認します。Log fileは実行ログが出るので、デバッグ時にtailしておくと便利です。
$ functions status
┌─────────────────────────────────────────────────────────────────────────────────────────────────────────────────────────────────────────────────────────────────┐
│ Google Cloud Functions Emulator                                                                                                                                 │
├──────────────────┬──────────────────────────────────────────────────────────────────────────────────────────────────────────────────────────────────────────────┤
│ Status           │ RUNNING                                                                                                                                      │
├──────────────────┼──────────────────────────────────────────────────────────────────────────────────────────────────────────────────────────────────────────────┤
│ Uptime           │ 4 seconds                                                                                                                                    │
├──────────────────┼──────────────────────────────────────────────────────────────────────────────────────────────────────────────────────────────────────────────┤
│ Process ID       │ 13616                                                                                                                                        │
├──────────────────┼──────────────────────────────────────────────────────────────────────────────────────────────────────────────────────────────────────────────┤
│ REST Service     │ http://localhost:8008/                                                                                                                       │
├──────────────────┼──────────────────────────────────────────────────────────────────────────────────────────────────────────────────────────────────────────────┤
│ HTTP Triggers    │ http://localhost:8010/wapa5pow-go/us-central1/:function                                                                                      │
├──────────────────┼──────────────────────────────────────────────────────────────────────────────────────────────────────────────────────────────────────────────┤
│ Log file         │ /Users/koichi.ishida/.anyenv/envs/ndenv/versions/v8.11.1/lib/node_modules/@google-cloud/functions-emulator/logs/cloud-functions-emulator.log │
├──────────────────┼──────────────────────────────────────────────────────────────────────────────────────────────────────────────────────────────────────────────┤
│ Emulator Version │ 1.0.0-beta.5                                                                                                                                 │
└──────────────────┴──────────────────────────────────────────────────────────────────────────────────────────────────────────────────────────────────────────────┘

If the Emulator becomes unresponsive, kill it will functions kill and then ensure that no other Emulator Node.js processes are running before restarting the Emulator.
Hello WorldをHTTPメソッドで実行
基本のファイルを作成します。npm initでpackage.jsonを作成します。
$ npm init
エミュレータにデプロイするために以下の行をpackage.jsonにdeploy-localを追記します。
{
  "name": "cloud-functions-ogp",
  "version": "1.0.0",
  "description": "",
  "main": "index.js",
  "scripts": {
    "deploy-local": "functions deploy createOgp --trigger-http --region asia-northeast1",
    "test": "echo \"Error: no test specified\" && exit 1"
  },
  "author": "",
  "license": "ISC"
}
次に、index.jsに以下を記載します。
exports.createOgp = (req, res) => {
  res.send(`Hello World!`);
};
npm run deploy-localを実行すると、createOgpがデプロイされます。http://localhost:8010/wapa5pow-go/asia-northeast1/createOgp をブラウザで確認すると、Hello World!と表示されました。
TypeScriptの導入
最近サーバサイドをGolangで書いているせいか型があると安心ですのでTypeScriptを導入します。packageをインストールします。
$ npm install typescript tslint --save-dev
型定義もインストールしておきます。
$ npm install @types/express @types/node --save-dev
TypeScriptのファイルはsrc以下に保存するので、ディレクトリを作成し、index.tsを作ります。
$ make src
$ touch src/index.ts
index.tsがコンパイルされて、ルート直下のindex.jsに保存されるようにtsconfig.jsonを設定します。
{
  "compilerOptions": {
    "target": "es6",
    "module": "commonjs",
    "outDir": "./",
    "noImplicitAny": true,
    "strictNullChecks": true,
    "sourceMap": true
  },
  "include": [
    "src/**/*.ts"
  ],
  "exclude": [
    "node_modules"
  ]
}
lintもtslint.jsonに設定しておきます。
{
    "defaultSeverity": "error",
    "extends": [
        "tslint:recommended"
    ],
    "jsRules": {},
    "rules": {
      "semicolon": [false, "always"],
      "no-console": [false]
    },
    "rulesDirectory": []
}
src/index.tsにTypeScript版のHello Worldを書きます。
import {Request, Response} from "express"

export const createOgp = async (request: Request, response: Response) => {
  response.send("Hello TypeScript!")
}
package.jsonのdeploy-localでTypeScriptをコンパイルしてからデプロイするようにするためtsc && functions deploy createOgp --trigger-http --region asia-northeast1と変更し、npm run deploy-localを実行します。
http://localhost:8010/wapa5pow-go/asia-northeast1/createOgp にアクセスすると、Hello TypeScript!と返ってきます。
Google Cloud Storageにおいた2枚の画像からOGP画像を生成する
画像の合成はImageMagickを使います。ImageMagickは画像変換をするためややサーバに負荷がかかるのですが、サーバレスであるCloud Functionsなら負荷を気にすることなく呼び出せます。
ローカルで動かすにはImageMagickをインストールしてからエミュレータを再起動させます。
$ brew install imagemagick@6
$ functions stop
$ functions start
Google Cloud Platformのバケットにアクセスするために鍵を作成する必要があるので、GCPのコンソールの[IAM & admin]=>[Service accounts]から[CREATE SERVICE ACCOUNT]で以下のように入力して鍵を作ります。バケット名などは適当によみかえてください。
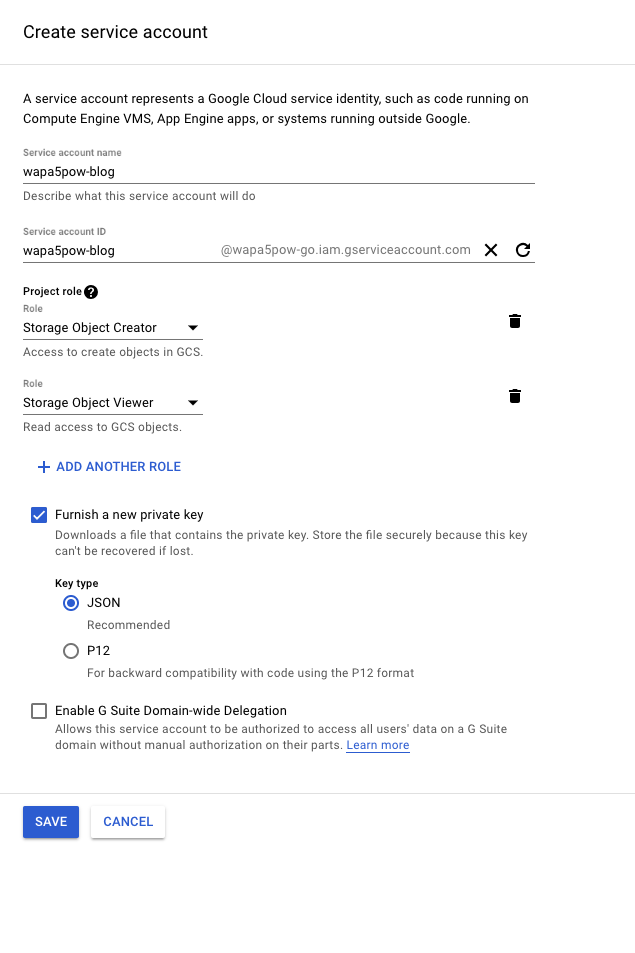
作成すると鍵が保存されるので任意のディレクトリに保存し、以下みたいに環境変数に設定してからfunctions restartをして、エミュレータを再起動してください。
export GOOGLE_APPLICATION_CREDENTIALS="wapa5pow-go.json"
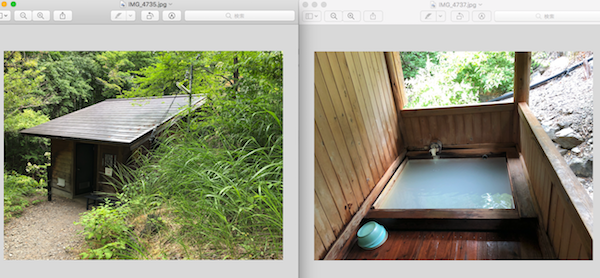
次に合成させたい画像をGoogle Cloud Storageのバケットに置きます。以下の画像を置きます。左からそれぞれgs://wapa5pow-blog/IMG_4735.jpg、gs://wapa5pow-blog/IMG_4737.jpgに保存しておきます。
Google Cloud StorageのバケットにCloud Functionsから読み書きするために以下のパッケージを入れます。
$ npm install @google-cloud/storage --save
$ npm install @types/google-cloud__storage --save-dev
あとは、TypeScriptを以下のようにかいて、OGPを生成します。
import * as Storage from "@google-cloud/storage"
import {exec} from "child_process"
import {Request, Response} from "express"
import * as path from "path";

const projectId = "wapa5pow-go"
const bucketId = "wapa5pow-blog"
const storage = Storage({projectId})

export const createOgp = async (request: Request, response: Response) => {
  const localFiles = await getFiles(["/IMG_4735.jpg", "IMG_4737.jpg"])
  const localOgpFile = await convertToOgp(localFiles)
  await uploadOgpFile(localOgpFile)
  response.send("Hello TypeScript!")
}

async function getFiles(files: string[]): Promise<string[]> {
  const promises: Array<Promise<string>> = []
  for (const file of files) {
    promises.push(getFile(file))
  }
  return await Promise.all(promises)
}

async function getFile(file: string): Promise<string> {
  const destination = `/tmp/${file}`
  const options = {
    destination,
  }
  await storage
    .bucket(bucketId)
    .file(file)
    .download(options)
  return Promise.resolve(destination)
}

async function convertToOgp(files: string[]): Promise<string> {
  const resultFile = `/tmp/out.png`
  await execute(`convert -resize 300x360^ -gravity center -extent 300x360 ${files[0]} /tmp/left.png`)
  await execute(`convert -resize 300x360^ -gravity center -extent 300x360 ${files[1]} /tmp/right.png`)
  await execute(`convert +append /tmp/left.png /tmp/right.png ${resultFile}`)
  return resultFile
}

async function execute(command: string): Promise<any> {
  return new Promise((resolve, reject) => {
    exec(command, {}, (err, stdout, stderr) => {
      if (err) {
        reject(err)
      } else {
        resolve(stdout)
      }
    })
  })
}

async function uploadOgpFile(file: string): Promise<string> {
  const extname = path.extname(file)
  const destination = `ogp${extname}`
  await storage
    .bucket(bucketId)
    .upload(file, {destination})

  return Promise.resolve(destination)
}
デプロイしてからアクセスするとgs://ogp.pngに冒頭のOGP画像ができました。
あとがき
本番環境では認証してからアクセスさせたりリクエストパラメータをうけとったりいろいろしていますが、基本上記の流れで作っています。 Cloud Functions + TypeScriptはあまり資料がなかたのでメモを残しておきました。